 Spring-boot

JavaWeb 的现代开发需要用到现有的脚手架,可以极大提高我们的开发效率,目前使用最普遍的莫过于 spring-boot 。学好 Spring-boot ,有利于我们后期自己研究如何开发更加快捷的低代码脚手架,所以一定要认真!认真!认真!
本文根据官方的教程对 spring-boot 进行重头学习和梳理,以便于形成整体认知,探索 spring-boot 的工作原理,为理解 Jeecg-boot 做准备。
此文章是个人梳理,对基础部分只进行快速实践,适合已经有一定 spring-boot 及 RESTful 风格开发经验的人查看。
# 搭建Spring-boot项目(原生态方式)
# 1. 通过官网构建spring boot
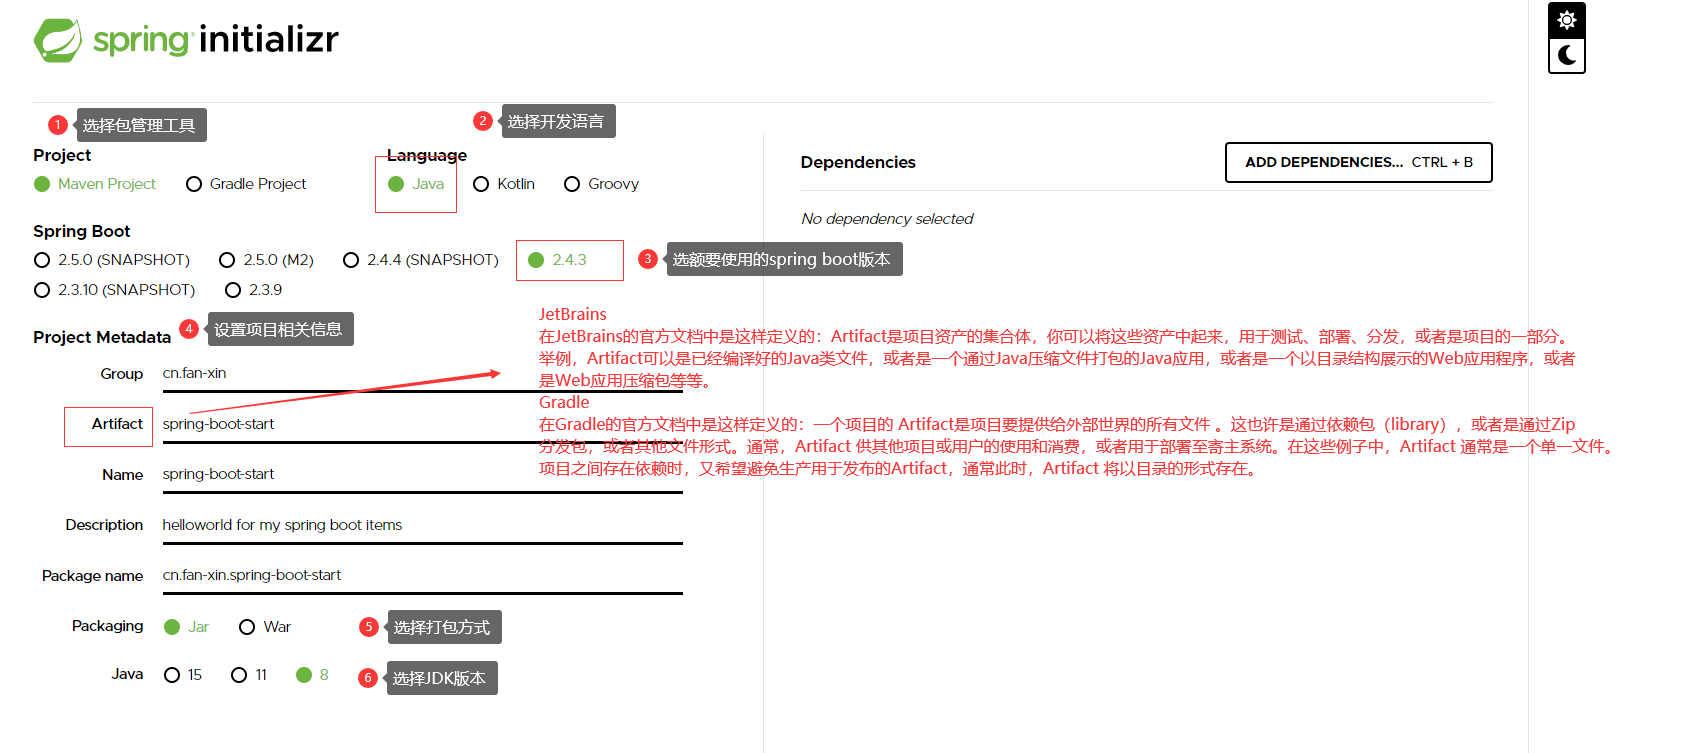
推荐第一次搭建 spring boot 项目通过官网文档给出的方式,能够更好帮助你了解 spring boot 是如何创建的。

打开官网,如上图所示,根据自己的需要进行设置。点击右侧按钮ADD DEPENDENCIES..可以为创建的项目添加你想要的起步依赖(当然也可以在后期的 pom.xml 文件中手动添加),此处添加 Spring Web 作为起步依赖,这个依赖包含了构建一个Web app最常用的RESTful、Spring MVC、Tomcat。
然后点击下方的 Generate 生成我们项目的zip包,解压后用 IDEA 打开即可看到一个spring boot 脚手架最开始的样子。

# 2. 添加代码
接下来我们可以开始完成我们第一个简单的 Hello World ,可以复制或者自己键入下方代码到 SpringbootApplication 文件中。
package cn.fanxin.springbootstart;

import org.springframework.boot.SpringApplication;
import org.springframework.boot.autoconfigure.SpringBootApplication;
import org.springframework.web.bind.annotation.GetMapping;
import org.springframework.web.bind.annotation.RequestParam;
import org.springframework.web.bind.annotation.RestController;

@SpringBootApplication
@RestController
public class SpringbootStartApplication {

	public static void main(String[] args) {
		SpringApplication.run(SpringbootStartApplication.class, args);
	}

	@GetMapping("/hello")
	public String hello(@RequestParam(value = "name",defaultValue = "fan-xin") String name){
		return String.format("Hello %s",name);
	}

}
2
3
4
5
6
7
8
9
10
11
12
13
14
15
16
17
18
19
20
21
22
hello()方法会传递一个名称参数,然后将此参数与"Hello"代码中的单词组合。也就是说,如果您在发起请求是设置name的值为fan-xin.cn,则页面返回是“Hello fan-xin.cn”。
@RestController注解告诉Spring,这段代码在网页上要返回一个对象(通常是Json对象,此处为了演示返回一个简单的字符串)。
@GetMapping(“/hello”)注解告诉Spring使用我们的hello()方法来回答这个问题被发送到请求http://localhost:8080/hello的地址。最后,@RequestParam告诉Spring期望name请求中的值,但是如果不存在,默认情况下它将使用单词 fanxin。
# 3. 尝试运行
接下来我们尝试使用最原生态的方式来构建和运行该程序:
- 打开命令行(终端)
- 进入当前项目所在的文件夹
- 输入命令(Windows)
mvnw spring-boot:run - 成功运行

- 在浏览器输入
http://localhost:8080/hello?fan-xin.cn,显示如下:

至此,我们就成功运行了我们的第一个spring boot项目的Hello world!!
# 创建一个RESTful风格的Web服务
# 1. 什么是RESTful风格?
REST这个词,是Roy Thomas Fielding在他2000年的博士论文中提出的. Fielding将他对互联网软件的架构原则,定名为REST,即Representational State Transfer的缩写。即"表现层状态转化"。如果一个架构符合REST原则,就称它为RESTful架构。
# 2. 怎么理解RESTful风格?
要理解RESTful架构,最好的方法就是去理解 Representational State Transfer这个词组到底是什么意思,以及它的每一个单词具体有什么含义。如果能够把这些单词的含义搞懂,就不难理解什么是 RESTful 风格了。
- 资源(Resources)
表现层转换,这个词语其实缺少了一个主语:资源(Resources),应该是资源在表现层的状态转换。
所谓资源,就是在网络上真实存在的一个实体,可以使用一个URI(统一资源定位符)指向它,每种资源对应一个特定的URI。要获取这个资源,访问它的URI就可以,因此URI就成了每一个资源的地址或独一无二的识别符。
- 表现层(Representation):
资源是一个实体,对外可以有多种呈现的形式,我们把资源的呈现形式就叫做"表现层"。
传统模式中我们展示一个静态网页的资源,那么网页的后缀是 .html ,其实这样做是没有必要的,因为我们想要访问这个html 格式的网页,只需要指定其URI即可,具体它是什么格式,其实应该在 HTTP 请求头信息中通过 Accept 和 Content-Type 来指定。比如常见的使用Json数据进行交互,可以把请求头的参数设置成下面这种格式:
headers: {
    "Content-Type": "application/json",
}
2
3
- 状态转化(State Transfer):
客户端想要操作服务器,必须通过某种手段,让服务器端发生"状态转化"。而这种转化是建立在表现层之上的,所以就是"表现层状态转化"。客户端操控服务端的手段是通过HTTP动词,最常用的几个动词如下:
| HTTP常用动词 | GET | POST | PUT | DELETE |
|---|---|---|---|---|
| 对应SQL语句 | SELECT | INSERT | UPDATE | DELETE |
| 功能 | 获取资源 | 新增资源 | 更新资源 | 删除资源 |
# 3. 总结RESTful风格
- 每一个URI都代表一种资源
- 客户端和服务器之间,传递这种资源的某种表现
- 客户端通过四个HTTP动词,实现"表现层状态转换"
# 4. 搭建RESTful风格的Web服务
- 创建一个spring boot项目,可从上一节开始
- 创建一个用来表现资源的实体类
Greeting:
package cn.fanxin.springbootstart.entity;

//要展示的资源实体类
public class Greeting {
    private final Long id;
    private final String content;

    //全参数的构造方法
    public Greeting(long id, String content) {
        this.id = id;
        this.content = content;
    }

    public Long getId() {
        return id;
    }

    public String getContent(){
        return content;
    }
}
2
3
4
5
6
7
8
9
10
11
12
13
14
15
16
17
18
19
20
21
22
- 创建一个资源控制器
package cn.fanxin.springbootstart;

import cn.fanxin.springbootstart.entity.Greeting;
import org.springframework.boot.SpringApplication;
import org.springframework.boot.autoconfigure.SpringBootApplication;
import org.springframework.web.bind.annotation.GetMapping;
import org.springframework.web.bind.annotation.RequestParam;
import org.springframework.web.bind.annotation.RestController;

import java.util.concurrent.atomic.AtomicLong;

@SpringBootApplication
@RestController
public class SpringbootStartApplication {

	private static final String template = "Hello %s";
	private final AtomicLong counter = new AtomicLong();

	public static void main(String[] args) {
		SpringApplication.run(SpringbootStartApplication.class, args);
	}

	@GetMapping("/name")
	public Greeting hello(@RequestParam(value = "name",defaultValue = "fanxin") String name){
		return new Greeting(counter.incrementAndGet(),String.format(template,name));
	}

}
2
3
4
5
6
7
8
9
10
11
12
13
14
15
16
17
18
19
20
21
22
23
24
25
26
27
28
29
- 资源控制器代码分析
ResstController: 该注解是@Controller和@ResponseBody两个注解的简写,该注解将类标注为控制器,并且返回域对象而不是视图。@SpringBootApplication:是一个很方便的注释,它添加了以下内容: -@Configuration:将Configuration标注在类上,相当于把该类作为spring的xml配置文件中的<beans>,作用为:配置spring容器(应用上下文) -@EnableAutoConfiguration:可以帮助SpringBoot应用将所有符合条件的@Configuration配置都加载到当前SpringBoot创建并使用的IoC容器。 -@ComponentScan:根据定义的扫描路径,把符合扫描规则的类装配到spring容器中。
# 5. 运行程序
在控制台输入:mvnw spring-boot:run,或者将该程序打成 Jar 包:mvnw clean package,然后进入 target 目录,执行 Jar 包:
cd target //从项目的根路径下进入target目录
java -jar  springboot-start-0.0.1-SNAPSHOT.jar //此处启动的项目是你生成的项目
2
# 6. 运行结果
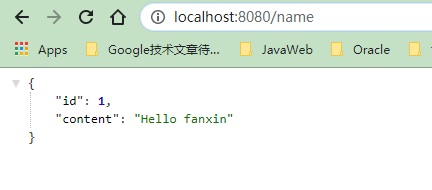
- 成功运行显示如下如:

- 访问路径:
localhost:8080/name

- 可以看到我们这里通过自己定义的greeting 对象返回了对应的 Json 格式数据,此处使用了 Get 动词,所以进行了数据的查询操作,使用
RESTful 风格编程就是只改变 HTTP 动词,请求的路径一直是/name,可以实现对应的 CRUD 操作!!
GetMapping("/name") //实现查询
PostMapping("/name")//实现增加或修改
PutMapping("/name") //实现修改
DeleteMapping("/name")//实现删除
2
3
4
以上CRUD操作都是用统一URI,只通过更改请求头信息来控制表现层的状态转换,这就是RESTful风格编程。
# 文章参考:
The Java EE 6 Tutorial (opens new window)